
My Bixler2 FPV Plane
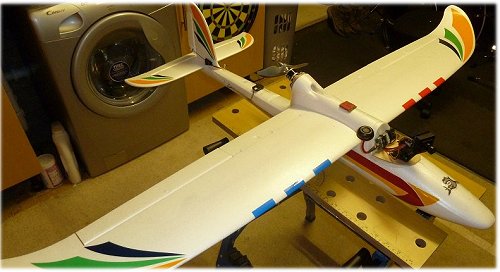
The Bixler foamie electric rc airplane, sold by Hobbyking, is a popular beginner's powered glider type plane with a pusher prop configuration. Because the prop is behind the wing and not on the nose, the plane is ideal for an FPV setup and has proved to be a popular choice as a first-time FPV plane.
Now, as a holder of a Private Pilot's License for small planes, I love to see our world from above. Once FPV became widely available and relatively affordable, it was inevitable that I was going to try it.
But although I have years and years of aeromodelling under my belt, most of which has been radio control (both building and flying), I'll be the first to admit that technology usually beats me. I guess I'm a bit of a technophobe, and so a journey into the Dark Side of FPV flying was never going to be a straightforward one for me!
Fortunately one of my forum moderators had got in to FPV a while ago, so he was able to give me some pointers. I also joined the excellent FPV Lab, a necessary go-to place for FPV tyros like me.
Research, Research, Research!
Despite my aeromodelling experience, my journey in to the world of FPV put me right where many of my website visitors are - on the "complete newbie" side of the fence!
The choice of FPV equipment is vast and completely overwhelming to the noob, and I soon knew exactly how a complete beginner to the radio control flying hobby must feel trying to choose a first plane.
But as with everything new, time spent on the web doing plenty of research gradually opened my eyes to it all, and I began to get a clearer picture of how it all worked and what I needed to buy.
Indeed it's fair to say that I spent more time doing the research than actually setting up my FPV equipment and converting the Bixler, but it was definitely time well spent.
My FPV Shopping List
After much research I decided that I wanted more than just the very basic setup. I wanted head tracking and an On-Screen Display, and so my list was...
- Hobbyking Bixler 2 plane.
- FatShark Attitude Goggles with Trinity Headtracker.
- A better quality camera than the one supplied with the goggles.
- A pan & tilt camera gimbal.
- Circular polarised antennas, to replace the straight ones supplied with the goggles.
- A Cylops Storm OSD unit.
- 2x 3000mAh 3S Li-Po packs.
- Various connectors, servo extension leads etc.
The replacement camera wasn't necessary, but I wanted the best setup I could afford and so bought a 700TVL (television lines) PAL camera to replace the 600TVL NTSC one supplied with the Attitude set. I only chose PAL because that's the standard here in the UK.
The stock camera wasn't wasted, since I put it on my ParkZone Radian Pro electric glider, and I simply swap the video transmitter (VTX) between the two planes. Having now used both cameras, I can say that the 700TVL one does, unsurprisingly, give a clearer image but the stock 600TVL one is perfectly acceptable for entry-level FPV flying.
One thing I didn't bargain for, however, was buying a new radio! This really upped the overall price tag of the project, and it was only necessary because the radio I have (a JR DSX9) is not compatible with the head tracking of the goggles.
Without going into the technicalities, the head tracking works by having the goggles connected into the 'trainer' socket of the transmitter, and having two auxiliary channels assigned to operate the pan and tilt functions of the head tracking.
Unfortunately for me, the JR DSX9 doesn't allow auxiliary channels to be used when the radio is in trainer mode, and so my choice was either to not have the head tracking option or to bite the bullet and buy a radio that was compatible. To the sheer disgust of my wallet, I opted for the latter.
Since all my receivers are Spektrum ones (the JR DSX9 is DSM2 compatible) and I had previously owned a Spektrum DX8 radio, before replacing it with the DSX9, it made sense to buy another DX8 because 1)it's a damn good radio, 2)it's very cheap for what you get and 3)it's Trinity Headtracker friendly! Oh, and 4)I'd already owned one so was quite familiar with it.
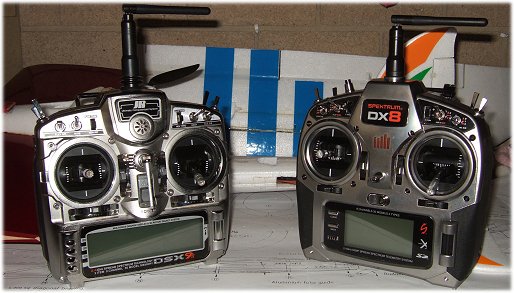
Above: the JR DSX9's incompatibility with
the Trinity Headtracker forced me to buy a Spektrum DX8.
So another couple of hundred bucks down the line, I was ready to begin...
The Bixler 2 FPV Conversion
There are some essential changes that need to be made to the Bixler 2, to accommodate all the FPV equipment.
Space inside the nose of the fuselage is generous but it soon fills up when you start stuffing so many electronic components inside.
Anyway, here's a brief rundown of what I did, with some pics to follow...
- Made a ply tray for the Li-Po and OSD, inside the nose.
- Strengthened the existing cockpit hatch with 1/16" ply, to mount the camera gimbal and VTX on.
- Made a 1/2" ply motor mount to replace the stock plastic one.
- Used 8x6 folding prop blades for less drag when gliding.
- Placed the Spektrum AR7000 rx in the tail.
- Placed the rudder and elevator servos in the tail.
- Used a 5v UBEC to power the receiver and servos.
- Inserted flat carbon spars into each wing for better strength.
- Eventually made up a central wing section, but more on that later.
Here are some photos, click on a thumbnail for the larger view...
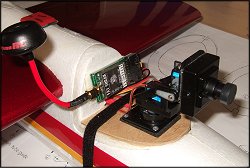
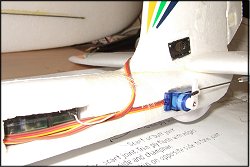
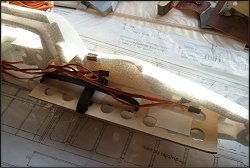
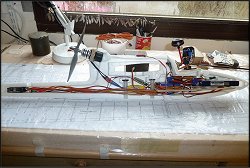
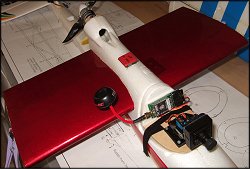
Above left: the camera, gimbal, antenna & VTX. Right: AR7000 RX & tail servos.
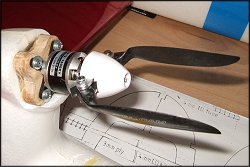
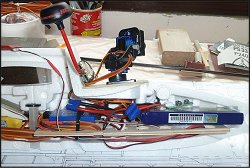
Above left: Folding prop blades & ply mount. Right: Inside the nose.
Above left: the ply Li-Po/OSD tray. Right: Inside the Bix fuselage.

Above left: the carbon wing spar. Right: new central wing section to reduce wing loading.
Bixler FPV Central Wing Section
As you can see above, one of the photos shows a central wing section attached to the fuselage.
This came about because the Bixler obviously gets seriously overloaded with all the FPV equipment; its wing loading is really increased and it goes from being a nice and stable beginner's plane to quite a handful.
I actually maidened my Bixler2 on the slope (rc slope soaring is my main love) and while there was good lift, I could tell that the plane wasn't happy.
An increased stall speed, along with a nasty tip stall, weren't things I was happy to live with and I knew that flying the Bixler in calmer conditions (i.e. less lift from a helping wind) would be difficult - at least with the kind of powered gliding that I wanted to do, rather than just tearing around the sky at full speed.
So I drew up a small plan for a central wing section and made it from balsa, covering it with iron-on Solarfilm. The section increased the overall wing area by about 25%, which more or less returned the wing loading value to nearer the stock plane's wing loading.
In real terms, this meant more lift and so slower flying speeds were attainable without the worry of this heavy old beast falling out the sky.
Another wing-issue I had, which explained the really bad tip stall that the Bixler suffered, was that the left wing was 10 grams heavier than the right one. By hanging the plane on string by the nose and tail, I could balance the plane laterally by adding lead to the right wing, until the plane didn't want to roll to the left.
This little tweak completely changed the stall characteristics, from a horrible and quite violent tip stall to a very benign dip of the nose. Along with the increased wing area, my Bixler2 FPV was a completely different and joyous plane to fly!
Soldering Skills
So how are your soldering skills??
If you are going to undertake a project like this, there is lots of wiring to get your head round. It took me a lot of internet research to work out what needed to be connected to what, and this was of course made more complex by the presence of the OSD unit.
But by taking my time I did get there in the end, and none of it was as bad as I initially feared.
There is soldering of many connections involved, so make sure that your soldering skills are up to scratch before you start. Servo wires will need to be chopped, spliced and lengthened, and various connectors need to be bought if you are going to do a 'ground up' FPV project rather than a simpler plug n' play one, such as the FatShark Attitude package allows you to do.
But let's face it - that's the beauty of this hobby; it's a never-ending learning curve and a great increaser of skills. And that's no bad thing at all!
Bixler 2 FPV Videos
I'll be the first to admit that I'm terrible at doing flight videos, and there are loads on YouTube of the Bix for you to check out.
Furthermore, I've never bought a recording device for my FPV stuff so I don't actually have the capability to produce an in-flight vid.
So here is one that I've found and shared - a Bixler with the same Cyclops Storm OSD as mine. Same view as I get, just different scenery...
And here is a short video of the head tracking on my Bixler in action...
Cyclops Storm RTH Test
When I first bought the Cyclops Storm OSD, my 'technophobia' took over and my brain shut down when I saw all the connections involved, to the point where I nearly didn't bother having the RTH function but instead only using it purely for the on-screen display of information.
But thanks to that internet research it soon became clear how it all worked, and connecting it all up properly wasn't at all hard.
I made a few successful FPV flights before having the nerve to try the Return To Home function, but I knew I had to test it sooner or later...
Convinced the Bixler would spiral down into the ground when the RTH took over, I bravely flicked the toggle switch on my radio to activate the RTH mode. The plane was about 400 meters away.
After the 1.5 second delay (an option in the OSD setup menu) the plane gently started to turn to the left without me touching the sticks (although I was controlling throttle).
It weaved left and right, but gradually flew itself back to above my head at a height of about 30 meters. Once over my head, it just circled and waited for me to deactivate the RTH and land it.
I was very impressed by this and although watching my Bixler fly itself was a bit unnerving to begin with, it did put a big smile on my face and I breathed a big sigh of relief that the RTH function did actually work!
So if you're going all the way with an FPV setup, like I have, do utilise this function and do test it - it's definitely worth the peace of mind.
Satisfaction Guaranteed!
Doing this little FPV project was immensely satisfying for me. As I said earlier, I am a complete technophobe and all the electronic wizardry involved did make my head spin to begin with.
But perseverance always pays off and I'm very glad that I was able to produce the FPV setup that I did. I learned new things along the way, and as well as the technical aspect of doing something like this, having an FPV equipped plane also challenges and maybe even improves your flying skills.
So if you're sitting on the fence contemplating an FPV project, I say go for it!
So long as you're a competent rc flyer and have a few workshop skills under your belt, then you'll be fine. As they say... if I can do it, anyone can do it! ;-)