RC Airplane World Flight School
- Lesson #7 : Take Off / Hand Launch
Following on from lesson 6, this rc flight school page will show you how to take off or hand launch your rc airplane.
The big moment you've been waiting for!![]()
You've researched and bought your plane, got familiar with it, assembled it, prepared it for flight, found a suitable location and now it's time to fly it!
The good news is that taking off or hand launching your rc airplane isn't usually too much of an ordeal. Far less scary than the landing, at least!
Whether you do an actual take off from the ground or a hand launch depends on a few things, which are...
- Whether or not your rc plane has landing gear (undercarriage).
- What type of surface you're flying from, and the size of the plane's wheels.
- Whether you just prefer one method to the other.
The presence or absence of landing gear will depend on the type of plane you have. For example, a classic high-wing trainer will have it, whereas a powered glider type will not.

Above: RTF rc airplanes can be bought with or without landing gear.
If your plane has landing gear, the type of surface you're flying from is critical to taking off.
If you're on concrete, tarmac, fine gravel or very short grass then a take off is easy.
If you're on longer grass or a very rough surface then your airplane might struggle to get the speed it needs to to get airborne.
In the same context, the size of your airplane's wheels is critical. Larger diameter wheels can cope better with more difficult surfaces, whereas smaller diameter wheels are only good for smooth, harder surfaces.
Finally, you just might prefer to hand launch your plane, even though it's got an undercarriage and you're flying from a smooth surface. Nothing wrong with that, if that's what you're most comfortable with.
The Take Off
Taking off your rc plane is, generally speaking, a simple process that lasts just a few seconds.
With all your pre-flight checks and range check complete (see previous lesson), and the transmitter antenna fully extended if you are using a MHz radio system, point the plane directly in to the wind if there is any.
It's important that you take off in to wind because this maximizes the airflow over the wings and control surfaces, and so reduces the speed and distance the plane needs to take off, so will get airborne sooner.
Of course, the issue here is whether or not the wind direction is favourable given your flying area size and orientation.
You might not be able to take off in to wind, in which case you should try and move to a position that allows you to take off in to wind, or take off crosswind.
Whatever you do, don't try and take off downwind (i.e. with the wind) as this increases the chances of the plane stalling and crashing on take off.
OK, ready to go? Smoothly increase motor power to full (take between one and two seconds to move the stick fully forward) and let the airplane accelerate along the ground.
It's likely that you'll need to use rudder to keep the plane going in a straight line - don't let it veer off to the left or right. Keep it straight and in to wind all the time, as best as you can.
If taking off in a crosswind, be prepared to use the rudder even more, to compensate, and also be very prepared for the plane to veer off sideways as soon as it leaves the ground.
Crosswind take offs are a bit trickier and shouldn't be attempted in your early days, unless absolutely unavoidable.
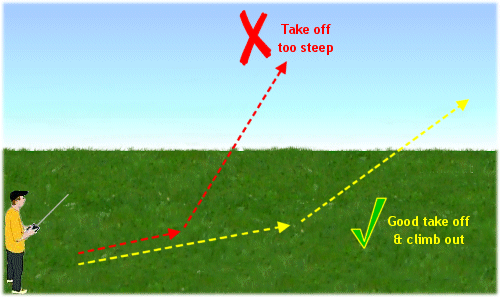
Once you're at full power and the plane is accelerating along the ground, gently apply a small amount of up elevator to help the plane off the ground.
Don't just yank back on the stick, but pull back smoothly. If you apply too much up elevator too quickly, and the plane hasn't yet reached flying speed, it can get airborne too soon and with too steep a climb rate. That's asking for a stall - not good!

Above: don't take off too early, or climb out too steeply.
The length of the take off run will vary depending on the plane, the ground surface and the wind, but generally speaking most rc airplanes take off in a very short distance; typically less than 10 meters (30') for many RTF foamies.
If you want a more scale-like take off with a longer ground run, apply power more slowly and use very little elevator and let the plane take off naturally.
Once the plane is airborne, maintain full power, or reduce power very slightly, and continue a smooth climb out (not too steep). Commence a turn before the plane gets too far away.
Hand Launching
Hand launching your rc airplane is simple enough but it's perfectly normal to feel uneasy the first few times you do it.
As for a take off, a hand launch needs to be done in to wind to maximise airflow around the wings, as well as the airflow over the control surfaces.
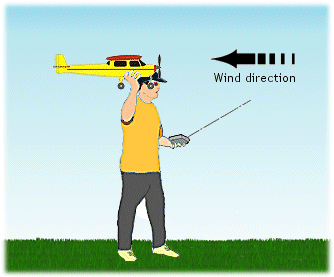
Hold your airplane at head-height, in whichever hand you feel most comfortable with, and have the transmitter in your other hand with your thumb on whichever stick it naturally falls onto i.e. it's going to be one stick or the other, depending on which hand the Tx is being held in.
With motor power at its maximum*, take a step forward and at the same time give the airplane a firm push out of your hand. It's important that you launch it firmly so that it's above stalling speed when it leaves your hand.
If you don't push it enough, it could stall and crash before your feet.
It's also important to try and keep your plane level, and don't point it upwards much.
If you do launch it with a very nose-up attitude, the same thing is likely to happen - a stall and a crash.
As soon as the plane has left your hand, get that hand onto the transmitter as quickly as you can so that you're immediately ready to initiate a climb (i.e. apply some up elevator) and make any necessary corrections to the plane's flight path as it leaves your hand.
*NB: maximum power for a hand launch might result in 'torque roll' as the plane leaves your hand. Torque roll is when the plane typically rolls to the left, in reaction to the torque force of the motor.
Depending on which plane you have, you might find that launching on, say, 3/4 power is more comfortable and less likely to produce the unwanted roll. It's just a case of trial and error really.

Above: hand launch at head-height and in to wind.
Below is a short video on taking off and hand launching your rc airplane (RealFlight rc flight simulator...
Well, if you've done things right then you should be safely airborne at this stage of the RC Airplane World Flight School - figuratively speaking, of course!
![]() Next up: Lesson 8 - Flying your rc airplane!
Next up: Lesson 8 - Flying your rc airplane!
Or skip to the lesson appropriate to your current situation...
- Lesson 1: Buying your rc airplane.
- Lesson 2: Know your rc airplane.
- Lesson 3: Preparing your plane.
- Lesson 4: Weight and balance.
- Lesson 5: Where to fly your plane.
- Lesson 6: Pre-flight checks.
- Lesson 8: Flying your rc airplane.
- Lesson 9: Landing your rc airplane.
All the above Flight School topics are covered in more detail in my Beginner's Guide To Flying RC Airplanes ebook.
