

RC Plane Servo Setup
As a beginner rc pilot, chances are you've bought a Ready To Fly (RTF) type electric rc plane and the servos (and other components, notably the receiver and ESC) are all nicely installed for you. That's the beauty of today's radio control flying hobby - you can get flying with minimum effort, should you want to!
But there will probably come a time when you buy an Almost Ready To Fly type plane, or build one yourself from a kit/plan, and need to install the radio gear yourself. I sincerely hope that you do go down this route and not just stay with RTFs, because the building side of the hobby is so very rewarding. That's another beauty of the rc flying hobby - it can be as consuming and challenging as you want it to be!
For when you do advance from beginner RTF to ARF or scratch built rc plane, this article will guide you through the process of servo installation.
RC Servo Selection
I'll assume that you have already bought the correct servos for your plane, based primarily on the size of plane and type of flying you're going to be doing. For example, aggressive aerobatic flying calls for more powerful servos than gentle stooging around with a little park flyer type plane.
And, needless to say, bigger rc planes call for bigger servos. The largest servos used are generally called large or giant scale servos, whilst the smallest are micro or even nano servos. In between are the micro and standard servo sizes. See the general rc servo page for more details.
Your servo selection should have been based on the plane manufacturer recommendations made in the instruction manual, or perhaps advice from fellow flyers at your club, or on an internet forum. Either way, the servos you choose need to be of the right specifications for the plane they are going into.
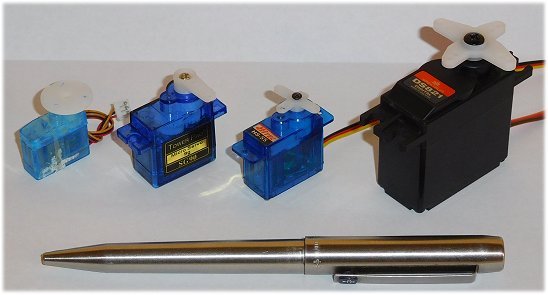
Photo above: choose your rc servos according to the plane manufacturer recommendations.
Servo installation - screw or glue?
Ideally rc servos should be screwed in place, preferably to a plywood (or plastic) tray or hardwood crossrails. Almost all servos come with lugs as part of the servo body, with a hole in to take a screw. Only the smallest nano type servos may not have a screw fixing option. Standard size servos will have four lugs, for four screws, whilst micro servos will (generally speaking) just have two.

Photo above: two standard servos screwed down onto a plywood tray.
 Standard (and giant) servos usually come with a rubber grommet and brass eyelet (ferrule) supplied, along with the servo fixing screws. Micro servos will not usually have the grommet and eyelet - the screw goes directly through the plastic lug of the servo body.
When screwing down a standard or large scale servo, it's important to insert the brass eyelets the correct way round inside the rubber grommets. The eyelets should be inserted into the lugs from the bottom i.e. so that the flattened end of the eyelet is at the bottom, between the grommet and the servo tray/rails. It seems more logical to insert the eyelets from the top so that the flattened end acts as a washer for the screw, but this is incorrect.
Some rc planes call for some, if not all, servos to be glued in place. I must admit I was surprised the very first time I came across a glued servo, but the advent of foam RTF type planes made glued servos more common. It's now not unusual to see servos glued in place, and it's really not a problem so long as the servo is secure. I have bought an RTF plane in the past where a minimal amount of glue/sealant was used and so the servo in question moved whenever it was operated - not good!
So if you have this type of plane (or any plane that uses glued servos) do make sure that the servos are glued securely! If necessary, remove any servos that don't seem secure and reglue them. Simply trying to move the servo with your fingers will soon tell you if they're secure or not.
A neat little trick, for gluing rc servos in place on their side , is to wrap the servo in masking tape (aka painter's tape) or similar. You might need to trim the width of the tape to suit the servo height. Wrap the tape around the servo body twice, making sure it's stuck well, and then use a suitable glue for fixing. I find two-part epoxy glue is best, but I have also used Gorilla Glue in the past.
The advantage of this is that if the servo needs removing at a later date, you simply cut through the tape and the servo comes out easily. You can then remove the old glue and tape before replacing the servo in the same manner.

Photo above: Left: micro servo taped ready for gluing. Right: micro servo glued into a wing.
Servo arm alignment
Generally speaking, a servo arm needs to be at 90° to the servo body, when in its neutral position. This gives equal directional movement (fore and aft) of the arm and hence the relevant linkage and control surface. Of course, there are always exceptions to the rule and some servo setups call for arms to be set at other angles. Flap servos, for example, often have the arm in a different position to 90° because movement of the flaps is only required in one direction.
The servo output shaft is splined, with corresponding splines inside the servo arm. These splines prevent slippage of the arm on the shaft, should the fixing screw become loose.
To set the arm at 90°, make sure the servo is in its neutral position. There are a couple of ways to do this;
1) If you've already bound your transmitter to the receiver, in preparation for the radio programming, simply plug the servo you're working on into the relevant channel slot of the Rx. Power up Tx and Rx. With the relevant Tx stick and trim in their neutral position, the servo output shaft will move to its neutral position.
2) Use a servo tester. A tester is a small standalone device that connects between a suitable power source (i.e. receiver battery pack) and the servo. The tester will have a 'neutral' button on it, which when depressed puts the servo into its neutral position.

Photo above: rc servo tester connected between battery and servo.
With the servo resting in its neutral position, you can now place the servo arm onto the shaft, as close as 90° to the servo body as you can get it. Secure the arm with the single screw provided.
Most servos come supplied with a selection of various arms - single arm, twin arm, quadruple (4) arm and disc are commonly supplied arm types. If you do have a quadruple arm, be sure to try all 4 arms in the approximate 90° positions; the offset of each arm usually means that one of the arms will get as close to the desired 90° position as possible.
Any final adjustments can be made with the radio sub-trim, but this is covered in the radio programming article.
The photo below shows how the offset of each arm of a quadruple servo arm changes angle as it's rotated on the splines, the green check showing the best option for a 90° alignment.

With the servos correctly installed and setup, the linkages to control surfaces can now be connected up, as per the instruction manual of the plane.
Related pages
 RC plane radio programming.

All of this and much more is covered in our Beginner’s Guide 👇
The Beginner’s Guide To Flying RC Airplanes is a 139-page, easy-to-read e-book written for complete newcomers. It explains exactly what to buy, where to fly, and how to avoid costly mistakes.
📖 Start reading now