

The RC Servo
On this page we'll explore the rc servo, a fundamental component and the 'hands' of your radio control system.
A servo's job is to convert electrical signals in to physical movement, the end result being an action of one thing or another on your aircraft.
The electrical (radio) signals are, of course, the ones that are sent from the transmitter (Tx) to the receiver (Rx) whenever you make an input at the transmitter.
RC servos come in many different sizes, and for various applications. They can be analogue or digital, with the latter becoming more commonplace in today's digi world.
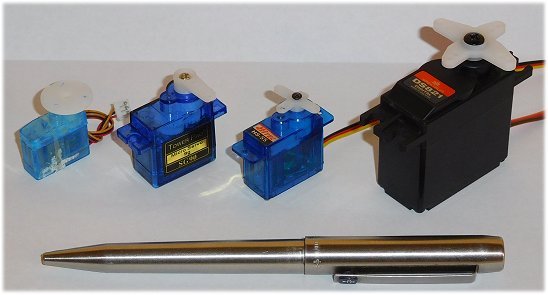
Photo: various micro servos & a standard servo (right).
What's in an RC Servo?
Your average radio control servo is made up of several different components:
- an outer plastic or aluminium casing,
- electric motor,
- amplifier (PCB),
- feedback potentiometer ('pot'),
- gears.
Modern servo motors can be brushless or coreless.
The gears can be plastic or metal, or a mixture of both. They may or may not be ball raced, depending on the quality of the servo. The better quality servos are ball raced, with the race being located around the main output shaft of the gears, so as to reduce friction when the shaft is rotating.
A splined output shaft exits the top of the casing, onto which the servo arm is attached with a single screw. It's this servo arm that is connected to the aircraft's control surface (or whatever) by way of a linkage.
The linkage directly transfers any servo movement to the relevant control surface.
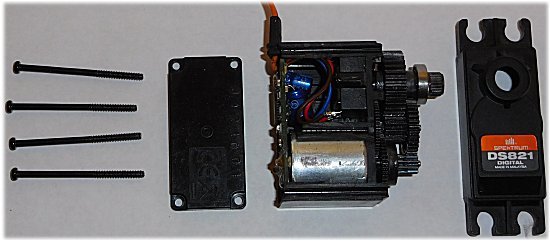
Photo: A standard servo broken down. Left to right - casing screws, casing base, main servo body showing inner workings, casing top.
 At the base of the servo body are the electrical wires which connect the servo to the receiver. Typically there are 3 wires - positive, negative and a signal wire. Some, but few, rc servos use 4 wires.
Where 3 wires are used the central wire is almost always the positive one; this reduces the chances of electrical shorting should the connector be put into the receiver slot the wrong way round.
The wires terminate in a flat plastic blade type connector which plugs into the respective receiver channel slot. Within the connector are female metal terminals which correspond to the male pins in each Rx slot.
Brand compatibility is a small issue, but most connectors can be used across most brands. In some cases a small plastic tab may need to be removed from the connector in order to get it to fit a different brand Rx (notably using a Futaba connector with a Spektrum receiver).
Photo: Cutaway photo of an RC servo. Example is a Spektrum DS821.

How a Servo Works
When you make an input at the transmitter, whether it be moving a stick or flicking a switch, a radio signal is sent to the receiver.
Once received by the Rx, a voltage signal is 'pulsed' to the respective servo, depending on which channel is being activated. These pulses are around the 50Hz frequency (1-2 milliseconds) for an analogue servo.
The incoming signals are continually deciphered by the amplifier (PCB - printed circuit board) and sent on to the pot, which is a type of variable resistor. The pot has a central rotating shaft onto which one of the gear cogs sits.
A series of gear cogs and pinions connects the pot shaft with the servo motor shaft. The servo output shaft extends upwards from the cog atop the pot.
Because the pot is a variable resistor, the voltage within the pot changes according to its rotated position, and this voltage is constantly monitored by the amplifier.
When a new signal is pulsed down the wires, the amp compares the new incoming signal to the present one. If they don't match up (i.e. a transmitter input has been made by the pilot thus changing the signal), the amp powers the motor to move in a particular direction and amount (time). This, via the gears, rotates the pot which then produces its new signal, only to be monitored again by the amp.
As the motor rotates, so does the output shaft so the end result is linear movement of the servo arm.
Essentially, the whole process is one of pulse modulation and error correction, which as far as I'm concerned is a whole other topic!
Man, that was a bit confusing to explain but I hope I've got the point across. The reality is you, the beginner rc pilot, don't need to drown yourself in electronic knowledge to be able to understand the basics of rc servo operation!
RC Servo Size & Weight
Radio control servos come in a wide variety of sizes. Long gone are the days when 'standard' and 'large' were the only options!
Servos weighing in at just a few grams can be bought for small and lightweight rc aircraft. Such servos are cheap to buy and readily available, but with everything do vary in quality (as do servos of all sizes).
The biggest servos are the large/giant scale ones, made to perform in the largest of rc aircraft. Top quality large scale servos can cost in the region of a few hundred bucks, so they're serious business indeed!
In between the two size extremes are the mini, micro and standard size servos.
An important specification of the rc servo is the weight, simply because weight is such a crucial factor with radio control aircraft.
A typical micro servo is around the 9 gram (0.3oz.) mark, whilst a standard servo will typically weigh around 40 grams (1.4oz.). Obviously weight is going to differ between different servos of the same size type, depending on whether the servo casing is metal or plastic, whether the gears are metal or plastic etc.
It's not unusual for rc aircraft manufacturers to specify the required servos by weight - eg "This plane requires four 9g servos."
Servo Torque Ratings
An equally important specification that you'll see is the torque of the servo.
All servos have a torque rating which gives the user a fair idea of the power of the servo.
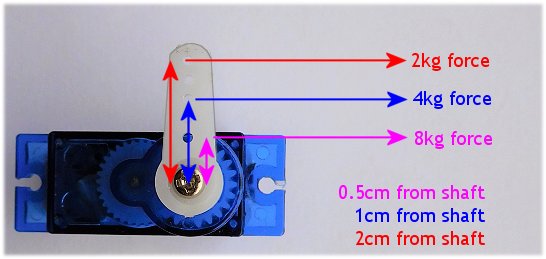
Torque is given in ounce-inches (oz.in) or kilogram-centimeters (kg.cm), and refers to how much force is produced by the servo, at any given distance along the servo arm. The actual rating given is for the amount of torque produced at 1cm along the servo arm from the output shaft.
Taking a standard servo as an example, it may have a torque rating of 4kg.cm. This effectively means that one centimeter along the servo arm from the output shaft, the servo could move a 4kg weight.
Due to laws of physics, levers and moment arms, the torque force varies as you move along the servo arm. Moving outwards along the servo arm lessens the force, whilst moving inwards closer to the shaft increases it.
The torque-distance relationship is a linear one, so moving out to 2cm from the output shaft halves the force, whilst moving to 0.5cm from the shaft doubles it.
Photo: image showing relationship between distance along servo arm from output shaft, and force produced (4kg-cm example).
It's not uncommon for two torque ratings to be given in the servo specifications. Typically these are for the torque produced at 4.8 volts and at 6 volts. These two voltages correspond to a 4-cell NiMH receiver pack and a 5-cell one.
Obviously the 6V rating is going to be higher than the 4.8V one, as more power is being provided to the servo.
Higher voltage servos are becoming increasingly available, largely as a result of lithium-based battery packs replacing the traditional NiMH ones. Not to mention the general electronic advancements being made!
RC servo torque ratings give you a fair idea of servo choice, but of course it's a near impossible task to determine exactly how much torque is required to operate a particular control surface.
Servo Speed
The servo speed isn't as important as weight and torque, especially for general sport flying.
When flying at a more advanced level, for example precision aerobatics, then the speed comes more in to play.
Like the torque rating, you'll often see two speed specifications for 4.8V and 6V. The speed rating refers to how quickly the servo arm rotates through 60°, and is given in hundredths of a second eg a rating of 0.15sec/60° @ 6V means that at 6 volts the servo will take 15/100ths of a second to rotate through sixty degrees.
Latency is a word you might hear with regard to rc servos, and the latency is effectively the time it takes for your aircraft's control surface to respond to your transmitter inputs.
The higher the latency, the longer the response time.
Digital vs. Analogue RC Servos
There was a time when all servos were analogue, before the world went digital.
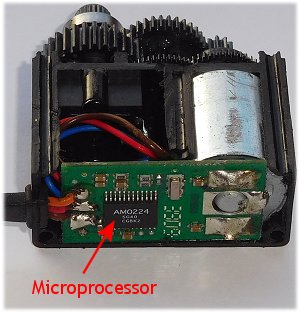 Nowadays digital servos are much more common and with time will doubtless replace all analogue ones. Visually both types of servo are the same to look at, but internally there is a tiny microprocessor built in to the amplifier of a digi servo (shown right).
Digital servos, unsurprisingly, perform better. They are quicker, more precise and have more 'holding power' because the voltage signals are pulsed at around 300Hz (300 times per second) compared to an analogue servo's 50Hz. That's six times as quick!
Thus, digital servos give much lower latency than analogue servos.
When powered up and at rest, digital servos can often be heard 'chattering' with a high-pitched noise; this is the result of those pulsed signals acting on the motor at 300 times a second.
Whether you choose to use analogue or digital rc servos depends on your type of flying and the aircraft that the servos are going into. There's absolutely nothing wrong with analogue servos for general flying, and as a beginner to the hobby you're not going to notice much difference.
Of course, many Ready To Fly rc planes these days come with digital servos as standard, but that's just the way the world has gone.
RC Servo Voltages
In days gone by almost all servos were rated at up to 6 volts or so, but advances in battery technology (principally lithium polymer) means that higher voltage receiver battery packs are becoming increasingly common.
So nowadays rc servos are being produced that can handle the higher voltage packs, for example up to 8.4V. A higher voltage means more power, so modern high voltage (HV) servos really can pack a punch for their size.
Rotary vs. Linear RC Servos
The majority of servos used in radio controlled models are of the rotary type, as in the ones talked about on this page.
But with the advent of micro size rc aircraft came micro linear servos.
Such servos first appeared in the Horizon Hobby Ultra Micro brand of airplanes and helicopters, in the early 2000s, and were a major leap forward in terms of weight and space saving.
Admittedly micro linear servos aren't overly powerful (although not bad for their size!), but they don't need to be when used in such lightweight model aircraft. RC linear servos are, of course, available in larger sizes and strengths but it's the micro-type that really made a difference to the hobby.
A linear rc servo works with a worm-drive; the small motor powers the worm-drive which in turn moves the control linkage forwards and backwards.
Photo: a linear servo uses a worm-drive to move the linkage.

Well, in writing this article I've discovered that knowing how an rc servo operates and trying to put it in writing are two very different things! Hopefully this page hasn't bogged you down with information overload, but has given you a basic understanding of what rc servos are and how they work to control our planes (and other rc models of course!).
Related Pages
 RC plane radio programming.

All of this and much more is covered in our Beginner’s Guide 👇
The Beginner’s Guide To Flying RC Airplanes is a 139-page, easy-to-read e-book written for complete newcomers. It explains exactly what to buy, where to fly, and how to avoid costly mistakes.
📖 Start reading now