RC Slope Soaring
- My Personal Passion!
Slope soaring with an rc glider can be one of the most relaxing and straightforward ways of enjoying radio control flight.
Or, at the other end of the scale, it can be an adrenaline-filled and completely exhilarating experience!
If you live close to a hill, or cliff, then there's really no excuse not to have a go at rc slope soaring. And for beginners to the hobby, it can be an easy introduction - it's relatively easy to master and, personally speaking, is my favourite type of radio control flying.
Slope Soaring Basics
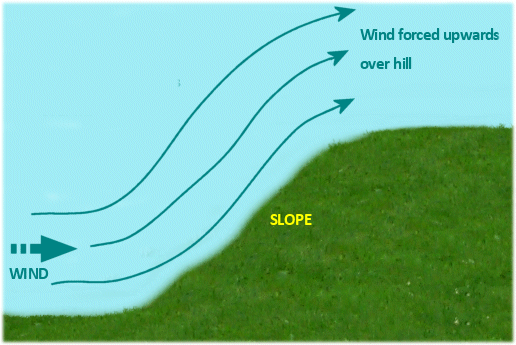
It's simple stuff really - moving air (i.e. wind) follows the lie of the land. So when a wind is blowing towards the bottom of a slope, the flow of air will naturally be forced upwards to follow the rising ground.
Where the slope levels out at the top, the airflow will continue upwards to a higher level than the hilltop. Also, the upward movement of the air will extend out in front of the slope, sometimes by quite a way.
It's this upwards flow of air that we use when slope soaring, to keep our gliders aloft.
Finding a Suitable Slope
This is of course very important! Not all slopes or hills are suitable for slope soaring, for various reasons.
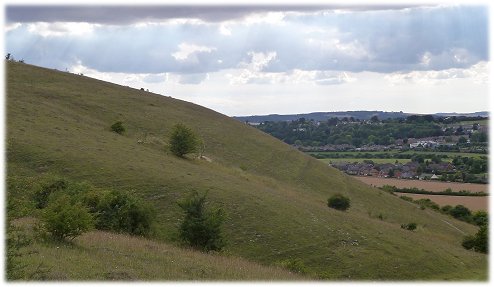
An ideal slope will have a drop of at least a couple of hundred feet and will have a gradient of at least 30 degrees, but steeper is better - up to a point.
A tree-free slope is ideal, but if there are trees on the bottom half of the slope then that's not so bad. Trees near the top not only present the obvious collision risk but can also create serious 'wind shear' problems, whereby smooth airflow is disrupted. This can play havoc with rc gliders!
Another important factor is whether or not the top of the slope, where you'll be flying from, is reasonably flat and clear of obstructions - this will be your landing area.
To give you an idea of a good slope, take a look at the photo below - this is actually my local hill that I fly from sometimes:
The Lie of the Land
When choosing a suitable site for slope soaring, it is of course crucial to factor in the wind and what it does in that area.
To get the best flights, the wind needs to be blowing directly up the slope at a fairly constant force.
So, a slope or hill that rises up from open land in front of it is a good one to fly from, because the wind blowing over the land will be uninterrupted.
A slope with other hills in front of it will not experience smooth airflow, because the wind will already be disrupted by those other hills.
Coastal sites are a good and favourite option, because on-shore sea breezes or stronger winds coming off the sea provide excellent rc slope soaring opportunities.
Coastal air is famously silky smooth most of the time, since the wind comes in over the flat sea with nothing to get in its way and create turbulence.

Above: a perfect rc slope soaring coastal site.
An important point to remember when choosing a site for rc slope soaring is, as always, whether radio control flying is permitted there in the first place. Always check first, and don't go getting yourself in to trouble with local authorities and/or land owners.
Launching your RC Glider
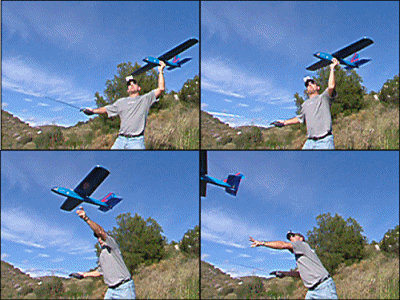 We'll talk about a standard hand launch for non-powered gliders here, because this is how the majority of gliders are launched for rc slope soaring (other launch options are a catapult system, or powered launch if your glider has a motor).
Ideally you should be standing a little way back from the start of the slope, and facing directly in to wind.
With all pre-flight checks complete, hold the glider at, or just above, head-height with one hand directly below the wing, or immediately behind it if it's a low-wing design glider.
It's difficult to generalise, of course, but basically hold your glider where it's comfortable and secure to, and as close to its Center of Gravity as possible.
Admittedly, some glider designs don't favour an easy place to hold them, particularly some 'flying wing' types or sleek mouldies with small fuselages.
A recognised launch method for such types, which either requires a launcher friend or your Tx on a strap, is to hold the glider with each hand on each wing leading edge. With arms raised, so the glider is above head height, the glider is launched by powering both arms forward and releasing it. This method takes some getting used to, but works.
But if doing a conventional single-handed launch, hold the transmitter in your other hand with the thumb on whichever stick it naturally falls onto. In my case, I launch with my left hand and so have my right thumb on the right hand Tx stick.
A transmitter neck strap is a real life-saver here!
Incidentally, I fly with a Mode 1 transmitter and this means I only have aileron control as I launch. Mode 2 flyers benefit from having aileron and elevator control on the same stick.
In all my years of flying, this is the only Mode 1 disadvantage I've found in the long running "which transmitter mode is better?" argument!
Anyway, back to launching... Take a few steps forward, or stand still if you prefer, and give the glider a very definite push into the air, out over the slope.
Make sure that the glider is launched horizontally, or even pointing slightly downwards. If you launch with a nose-up attitude then there's a chance that the glider will stall and crash if your push wasn't strong enough, or if the wind up the slope pitches it up too much before adequate airspeed has been reached.
If the wind is strong and you launch nose-up, your glider might just end up doing a loop over your head and crashing behind you.
As soon as the glider has left your hand, get your thumb on the other transmitter stick so you have full control.
With any luck your glider should gain height as soon as it leaves your hand. If the lift is good, then you might be surprised at just how quickly it climbs in the first few seconds of the flight.
If this happens (it's a good thing!) apply some down elevator right away. This will push the nose of the glider down and give it better forward penetration in to the wind, thus gaining speed and getting out over the slope.
Using the Wind
As we now know, rc slope soaring is made possible because of the action of the wind.
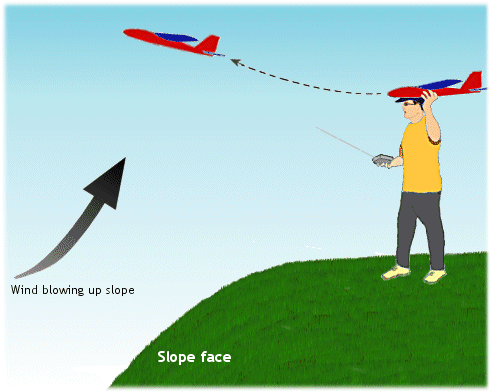
As previously mentioned, any moving air that encounters rising land is naturally forced upwards over that land, and this upward movement of the air is called ridge lift.
Generally, it's this rising air that you're using to keep the glider airborne - if the wind stops, or dies down, then the glider will only stay up for so long.
The optimum area for catching this ridge lift is just in front of and above the upper reaches of the slope. If the wind is constant and you keep your glider within this area, you can get some very long flights!
So to get the best out of it, you need to fly your glider parallel to the slope face and not too far away in front of you. In other words, fly by making a pass left to right or right to left, turn the glider through 180 degrees and repeat the pass going the other way.
The important thing to remember here is to always make your end turns in to wind i.e. away from the slope.
Turning your glider in towards the slope means a decrease in relative airspeed and increasing proximity to the ground, if only momentarily.
Of course, with experience you will be able to judge whether it's safe to make a downwind turn, but for your early days try and keep all your turns in to wind.
If you fly the glider too far away from the slope face then you risk flying out of the rising air and losing lift, which can result in a long walk down the slope to retrieve your fallen glider.
But with that said, slope lift can extend a long way in front of the slope on good days, so don't be frightened to experiment and be adventurous!
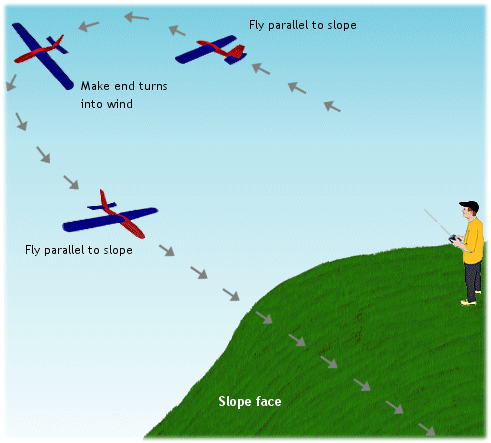
As you fly from side to side, you'll notice that your glider will gain altitude with each pass - hopefully. This is the rising air pushing the glider upwards.
If you're confident to do some basic aerobatics, just let the wind carry the glider higher as you fly it from side to side.
When you've reached a good height, now's the time to have some fun - put the nose down, get up some speed and enjoy!
The video below shows these basic slope soaring tips, as performed on the RealFlight rc flight simulator (sorry about the jumpiness of the vid, something happened during upload to YT to produce this)....
...while below is a slope soarer on the Phoenix sim...
This next video is of me enjoying an evening flight on my local slope with my Eraser EPP 'combat' glider...
That Sinking Feeling...
Bear in mind that good lift will not always be present, even with a wind blowing up slope.
From time to time you are likely to encounter the dreaded 'sink', which occurs when a lump of cooler or downward moving air blows through. Once an area of sink arrives, then your glider is only going to go downwards.
There's not much you can do if you fly into an area of sink, other than to try and fly out of it as quickly as you can. And sometimes that's easier said than done!
Sink can appear at any time, even when the lift is generally very good. And it appears suddenly.
It's no fun when you watch your mates buzzing around the slope, and then you go and launch in to a patch of sink that's just appeared! It's happened many times...
When flying around, there will be times when your glider isn't going forwards very fast. The answer here is to simply push the nose down; apply down elevator and the glider's speed will increase.
In a way, you can think of applying down elevator as the throttle. More of it gets you more speed!
The Slope Landing
This is the trickiest part of rc slope soaring, but if you've chosen a good slope with a clear and flat top then you shouldn't have too many problems.
Get the glider to a suitable height (say 50ft. or so) above you and bring it round in a wide circle back over the top of the slope and out to your side. It'll speed up a bit as it turns downwind coming off the slope, but that speed will decrease again as you turn it back in to wind for final approach.
Don't let your glider get too far behind you, but when it is at a point where you feel that you can bring it down to land somewhere close to you, then begin the landing approach. Gently turn it back in to wind and use the elevator to get it down onto the ground.
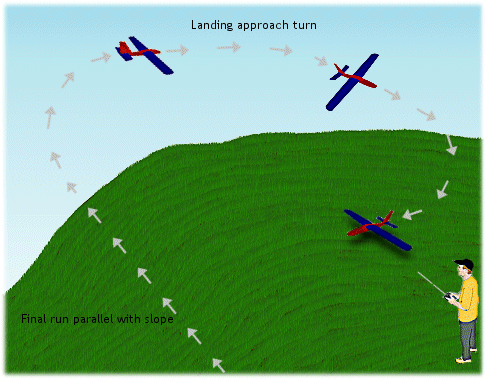
If the wind is strong, you might have trouble getting the glider down using a normal approach angle. In fact, you might even find yourself having to go around several times if you overshoot and the glider catches the wind again too close to the edge of the slope. Just keep trying and see each aborted landing as good practice!
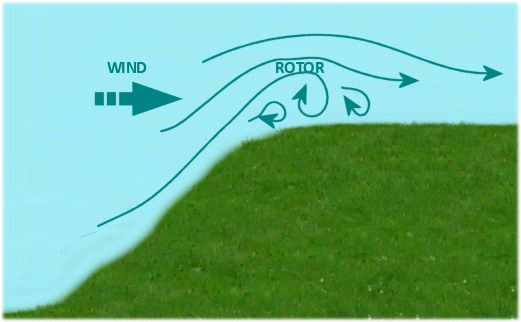
Something you do have to watch for when landing is turbulence, or rotor.
This is more of a problem on steeper slopes and particularly cliff tops. Air coming over the brow of a steep slope will be disrupted as it 'tumbles' over the top, and the airflow can become very rough which makes landing tricky. In these cases, just fly further back to land in the area of smoother air.
Landing Out
From time to time you might be unfortunate and the lift deserts you during your flight. All your best efforts cannot get the glider gaining altitude, and you realise with horror that you have to 'land out' at the bottom of the slope.
It's not much fun, but all you can do is commit to the landing and keep a cool head. Pick a spot to land, although to be fair a suitable spot might not be easily visible from where you're standing.
Judging your glider's height is not at all easy when it's so far below you. If it's a sunny day and the sun is in the right place, you might be lucky enough to be able to track your glider's shadow - when the shadow is getting close to the glider, then you know you're getting close to the ground.
When landing out, try to land in to wind if you can, and if there's a field of crop then try and land close to the edge, in the crop. The crop will hopefully stop any damage, and if you've landed on the edge of the field then the glider shouldn't be too hard to locate. Hopefully...
Other tips for RC slope soaring
- Judging the wind strength is very important - too strong and you'll have trouble launching and controlling your glider, too weak and the glider won't gain enough altitude for a successful flight.
- Don't fly over your head. It's easy to become disoriented and if this happens the results can be nasty.
- Don't fly downwind (with the wind) for too long if you can help it. An rc glider will quickly lose lift flying downwind, and it's not always easy to regain lost altitude.
- If you're going for long-duration rc slope soaring sessions, don't forget about the radio control gear batteries! If they die, so does your glider.
- If you're completely new to rc slope soaring, try and fly from a gentler slope rather than a steep one.
- If you're flying from a cliff top, be very confident about the conditions before you throw your glider off the cliff and out over the sea.
Slope soaring is indeed great fun, and given the simplicity of rc gliders is very rewarding. You don't need lots of accessories with a glider either, and given the right conditions you can make a flight last for a very long time because there are no recharging or refueling issues.
It's my personal favourite way of enjoying some good rc flying, and I highly recommend it!
