Trimming Your RC Plane
- How To, and Why You Should
Trimming your rc airplane is an important procedure, and when properly trimmed your plane will be so much nicer to fly, making your life at the Tx sticks that much easier.
The aim of trimming a radio control airplane correctly is to get it flying straight and level at 'cruising speed', with no input from you at the transmitter sticks.
In other words, with the elevator, aileron and rudder sticks in their central positions the plane should fly in a straight line. The throttle stick will typically be halfway to two-thirds full power, depending on the model.
Basic Trimming
As a newbie rc pilot, the chances of you doing any advanced trimming are low; trimming your plane will likely involve nothing more than moving the transmitter trims to compensate for any unwanted tendencies of the plane to fly in any direction other than the one you want it to fly in.
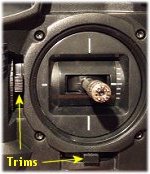
 The transmitter trims are located beside the sticks and correspond to their parent control. They can be analogue slide trims, held in position by a simple ratchet system, or they can be digital button trims - common on today's radios.
Moving a transmitter trim will move that particular control surface a very small amount, and that new position will be the new neutral position. This lets you 'fine tune' your airplane's flight path.
For example, if your plane wants to roll to the left all the time then you would apply right aileron trim until the plane flies level on its own, without wanting to roll.
This type of trimming is completely common practice and even the best trimmed plane will need the occasional, or even regular, tweak of a transmitter trim here and there. It's perfectly normal to have to tweak the Tx trims on every flight, to make subtle changes to the plane's neutral flight path.
Advanced RC Plane Trimming
Transmitter trims get very regular use, even by the world's most experienced rc pilots. But trimming an rc plane actually goes beyond only relying on the Tx trims; it involves a bit of aerodynamical knowledge and good workshop habits!
In other words, you need to build your plane correctly and understand the forces that act on it in flight.
If you've bought an RTF or ARF plane all the construction work has been done for you, but you should still check it over to check for good and correct alignment of wings and tail surfaces. Poorly aligned, bent or twisted surfaces will only result in a poorly performing plane.
If you're building from a kit or from scratch, you need to take care when building and be sure that there are no warps, bends or twists where there shouldn't be. Any of these will have a very negative effect on your airplane's flight characteristics.
Assuming that your plane is correctly built and has everything aligned correctly, it should fly perfectly first time out, right?? Wrong!
RC planes rarely fly perfectly, the best we can ever hope for is that a couple of clicks of transmitter trim will sort things out on its maiden flight.
But what if your rc plane flies really badly, yet it's been built well?...
Here we come to the true point of this page, and that's how to trim your rc airplane by adjusting its Centre of Gravity (CG) and/or motor thrust angles.
This all might sound very technical and complicated, but it's really not and once you've done it once, and seen the results, you'll want to do it to all your planes.
Centre of Gravity
You can read about balancing rc airplanes through that link, but just to recap, the CG is the point at which your plane balances fore-aft (longitudinally). This means that when your plane is supported on its CG position and is balanced correctly, it will balance level or perhaps with its nose pointing down slightly.
RC planes rarely have one exact point of balance; the acceptable CG usually lies within a narrow range, and the precise location of the Centre of Gravity can be moved within this range, without having any adverse effects on the plane's flight characteristics. It's only when you move the CG outside of its range do the problems begin.
This moving of the CG fore or aft, within its range, is a major part of correctly trimming your rc airplane. Any movement of the CG will slightly effect your plane's pitch attitude, elevator sensitivity and how it wants to fly as a result.
If you move the CG forward then this increases the plane's stability (up to a point) and generally makes it less sensitive to elevator inputs. Conversely, moving the CG rearwards increases the sensitivity to elevator inputs and makes the plane less stable - but better for aerobatics. Moving the CG too far rearwards will make the plane completely uncontrollable.
Balancing your rc airplane correctly in the first place is very important, but once balanced you can tweak the CG position to improve the plane's flight characteristics, and to suit your personal preferences.
In-flight CG Test Methods
There are a couple of widely accepted methods to find out whether or not your plane is optimally balanced.
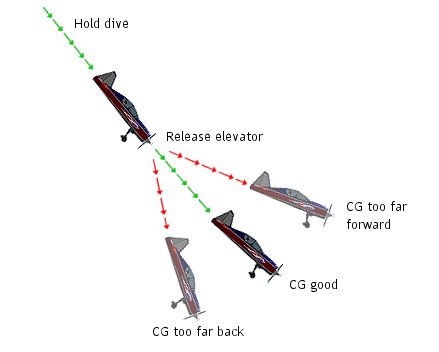
- 1. The dive test. Climb your plane to a safe altitude (say, 100m/300ft.) and set the Tx trims so that it flies straight and level, at cruise speed, with the elevator stick centered.
Reduce power and apply down elevator to put the plane in to a steep dive - greater than 45°.
Once established in the dive, return elevator to neutral and see what the plane does. If it pulls out of the dive sharply then the CG is too far forward. If the dive angle increases then the CG is too far back. Ideally you want the plane to gradually and naturally pull out of the dive.
The key to a successful dive test is the pre-dive trimming, because it's this that effects what the plane will do in the dive. The increased speed during the dive makes the elevator more effective, so any elevator trim you applied beforehand will have an exaggerated effect in the dive. - 2. Inverted flight: use your Tx trims to get the plane flying straight and level with the elevator stick centered.
Fly a straight pass at cruising speed and roll the plane through 180° to get it inverted, and take note of how much down elevator you need to apply to keep the plane flying level.
If you need a lot of down elevator then it's probable that the CG is too far forward. If your plane wants to climb and you need to apply up elevator to keep it level, the CG is too far back. If it takes very little or no down elevator to keep it level, the CG is about right.
Bear in mind, though, that not all planes like inverted flight - especially high wing trainers. For this reason, inverted flight isn't a brilliant way of testing the CG, but it's just another option open to you.
The image below illustrates a dive test:

Above: the dive test is a good way to test the CG.
Depending on the results of either test, you can adjust the position of the Centre of Gravity accordingly and you'll almost certainly see an improvement in your plane's handling.
Whilst the Centre of Gravity balancing of your plane is critical, the roll balance (lateral balance) is another one to check - you can read about this on the 'balancing rc airplanes' page via the link further up this page.
Motor Thrust Angles
This is an often overlooked aspect of trimming your rc airplane, but the improvements in flight characteristics can be dramatic with only slight changes to the motor thrust angles.
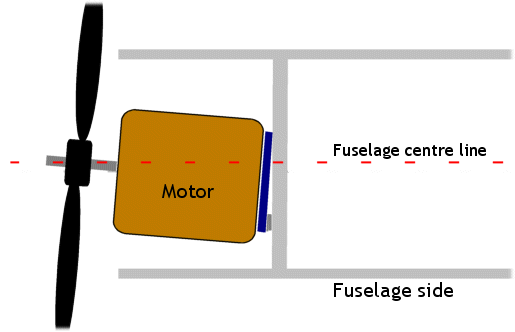
Thrust angles are factored in to an rc airplane's design where necessary. The two common types of thrust angles are right thrust whereby the motor is angled slightly to the right, when viewed from above, and down thrust whereby the motor is angled downwards slightly.
Left thrust and up thrust are the less frequently used angles.
Right thrust is more common than left thrust because the majority of rc planes have anti-clockwise rotating propellers (when viewed from the front), and the combination of motor torque and prop wash spiralling around the fuselage and hitting the left side of the fin can cause an unwanted yaw and/or roll to the left when the plane is under power. Right thrust compensates for this.
Typically right thrust values amount to just two or three degrees, but the exact amount will vary from plane to plane.
It's quite common for beginner rc pilots to notice the right and/or down thrust in their shiny new RTF plane, and think that the motor has been put in badly. This isn't the case - it's intentional!

Above: right thrust illustrated on an electric
rc plane motor (viewed from above).
Down thrust is commonly used to reduce the natural climbing tendency of the plane, but it isn't always necessary. Generally speaking, a high wing plane will need more down thrust than a low winger.
Trimming your rc airplane correctly should involve checking the motor thrust angles, and it's an easy test to perform.
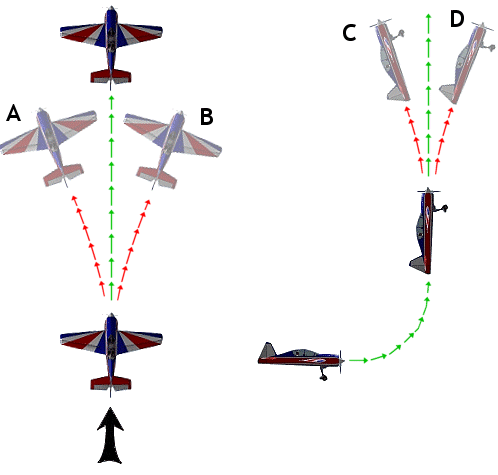
To check your plane's side thrust, fly a straight and level pass at cruising speed. Apply full power and pull up in to a vertical climb, using rudder only to straighten the climb initially. As soon as you can, centre the rudder stick and see if the plane yaws one way or another as it's climbing vertically.
If the plane yaws to the left, then more right thrust is needed, and if it yaws to the right then there is too much right thrust. If it climbs vertically then the side thrust is OK.
To test the down thrust you can perform the same vertical climb; if your plane wants to pitch inwards as if starting a loop then there's not enough down thrust. If it pitches outwards then there is too much down thrust.

Above: using a vertical climb to test motor thrust angles -
A = insufficient right thrust
B = too much right thrust
C = insufficient down thrust
D = too much down thrust.
Another simpler way to test the down thrust is to fly the straight and level pass at about 1/2 power, then quickly apply full power. If the plane pitches up wildly then you need to increase down thrust. If the plane suddenly pitches downwards when you apply the power, the down thrust is too much.
Ideally you are looking for nothing more than an increase in speed and a slight gain in altitude when you increase power, this gain being a result of the increase in lift as the airspeed increases.
Motor thrust angles can be adjusted by placing small washers behind the motor mount, or by adjusting the angle of the motor on the mount. How you can change your plane's thrust angles depends entirely on how the motor is mounted.
Aileron Differential
Aileron differential is the difference in deflection amounts between upward moving and downward moving ailerons. It effects how 'tidily' a plane turns.
It's another thing you might want to, or need to, look at when trimming your rc plane, but in the interests of keeping this page relatively short, you can read about aileron differential here.
Trim, Trim & Trim Again!
The trick to trimming your rc airplane correctly is to just keep trimming it until it flies nicely and goes where you point it, without you having to fight the sticks all the time.
It's often the case that several trimming flights are needed, so it's not a process that should be rushed. Set aside one or two flying sessions soley to trim your plane and get it flying at its best. You'll notice a huge improvement in the way the plane handles, and aerobatic maneuvers will be so much easier to pull off!
Well hopefully the above article should give you an idea of how to correctly trim an rc airplane in a way that goes beyond just using the transmitter trims each time you fly.
As I said at the beginning of this page, as a beginner to the radio control flying hobby you're not expected to do much more than use the Tx trims, but with time you will probably find yourself wanting to correctly trim an rc airplane by using the methods outlined above.
