Flying Model Airplanes
- Tips for a Successful 1st RC Flight
Important update: this page about flying model airplanes has been downgraded and now only gives a general overview of the basics. While this page is still relevant for simpler planes, the full rc flight school pages now give more detailed info. For a truly complete guide, please check out my Beginner's Guide To Flying RC Airplanes. downloadable ebook.
Flying radio control model airplanes is an exhilarating hobby and a great deal of fun, and if you're in the market for a new hobby then why not consider this excellent pastime?!
The hobby of rc flying has exploded in popularity over the years, and this website (rc-airplane-world.com) is all about helping you to get started quickly and safely.
This 'introductory flight school' page will give you some essential advice for flying model airplanes of the simpler 2 or 3 channel electric park flyer type. These are very widely available nowadays and can be flown without prior experience, so long as you're sensible.
Your flight school lessons on this page cover:
Depending on your budget and how serious you are about rc flying, you can purchase an rc flight simulator to practice on, but these are not necessary for a simple 2 channel model airplane. They are, however, a very good idea if you're going to move on to bigger, more advanced rc airplanes. I never hesitate to recommend getting a sim.
And if are are serious about the hobby, seeking out your local rc airplane club is a great idea if you do want to learn to fly bigger and faster airplanes, especially IC powered ones. Use the rc airplane club directory in this website to look for clubs in your area, there may be one closer to home than you think!
If the directory doesn't list a local enough club, try these websites - these are the respective country's governing bodies for flying model airplanes and each has a club locator facility:
Such organisations will give you all the info you need, including liability insurance requirements which may be mandatory in some places.
So let's now take a look at what's involved in flying a model airplane, remembering that we are only talking about a simple electric 2 or 3 channel 'park flyer' type.
RC airplane weight and balance
If you've purchased an RTF rc airplane and followed the manufacturer's instructions, the weight and balance should be reasonably OK but it is imperative that you check the balance before flying any rc airplane, as an incorrect balance can make the plane uncontrollable and likely to crash in inexperienced hands.
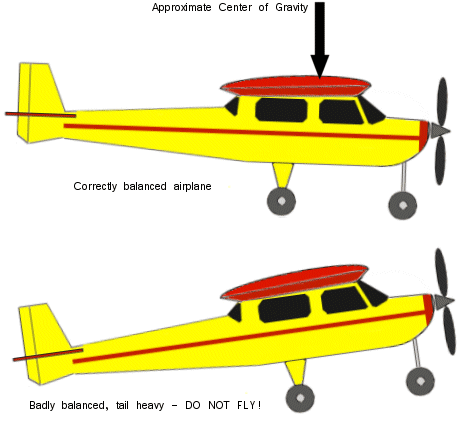
All flying model airplanes, just like real ones, have a Centre of Gravity (CG) that effects the plane's balance and thus its flying characteristics.
The CG, as a very general rule, is usually found between 25% and 50% of the wing chord (width of wing) back from the leading edge (front edge of the wing), with around 30% of the way back being a common location. In many cases this will be the approximate location of the main wing spar, should there be one.
The exact location of your airplane's CG should be given in the instruction manual, and this should be the point that you balance the plane.
A simple and quick way to test your airplane's balance is to place the tips of each index or middle fingers under each wing, at the exact CG point as indicated by the manufacturer, and a couple of inches out from the fuselage sides. Gently lift the airplane up so it balances on your fingertips.
If the balance is correct the plane should be either level or with its nose pointing slightly downwards. If the tail is pointing downwards do not fly it yet! The airplane is tail heavy and this is the worst case of improper balance for a plane.

If your plane is tail heavy, you need to either try and reposition the motor battery pack further forward or, if the pack can't be moved, add weight to the nose of the plane. Modelling clay or fishing shots/small lead weights are ideal, but add only enough to make the plane balance correctly. Moving the battery pack is the better option though, by doing this you're not adding 'dead weight' to your plane.
Getting the balance correct is of paramount importance if you want to keep your airplane in one piece.
![]() Read more about balancing rc airplanes.
Read more about balancing rc airplanes.
Pre-flight checks
Pre-flight checks are essential for any rc plane. Even obvious things can be missed if you're too eager to get the plane in the air, and such mistakes can often result in a crash.
Your airplane's instruction manual should outline the pre-flight checks needed for that specific airplane, but as a general guideline basic checks include:
- Wing and tail securely fastened,
- Prop (and spinner) secure,
- Control surfaces moving freely and correctly,
- Motor operation correct,
- Everything inside is secure (no loose components, especially battery pack),
- All servo horns and linkages secure,
- Radio control transmitter batteries OK,
- Range check.
This last one, the range check is absolutely crucial and mustn't be overlooked! The purpose of the range check is to make sure the radio signal from Tx to Rx is strong, so that you can fly your plane at a safe distance away from you without it going out of radio range.
To perform a range check with an older MHz radio, switch on the transmitter and then the receiver, and collapse the Tx antenna (i.e. put it fully down). With a 2.4GHz radio you will need to follow the manufacturers instructions for getting the Tx in to range check mode.
With your Tx prepared, walk backwards away from the airplane for 30 paces or so. As you walk away from the plane, keep moving the control surface sticks of the Tx (not the motor stick - keep this down!) and closely watch the respective control surfaces of the airplane.
If you only get a few paces away and the surfaces start 'twitching' or not responding properly to the stick movements, do not fly. Check the transmitter batteries, they may need replacing/recharging; low batteries in the rc gear drastically reduce the radio range. Also check for loose connections to the receiver etc.
If the batteries and connections are OK but the control surfaces still don't respond properly then other people may be flying model airplanes nearby on your MHz frequency. Again, do not fly if this is the case. Interference is a big killer of rc airplanes and you need to be sure that your frequency is clear before you get airborne. 2.4GHz rc systems don't suffer the same interference issues as the MHz ones.
Whatever the reason for the problems, do not fly your rc airplane if you see that control surface response becomes unreliable before you reach 30 paces or so away from the plane. Identify and rectify the problem before flying.
![]() Read more about rc airplane pre-flight checks.
Read more about rc airplane pre-flight checks.
The test glide
While not necessary, and not commonly done, you might want to test glide your airplane before flying it, especially if it's of the rc powered glider variety.
The purpose of doing this really just to make sure that all is OK, and the plane has a friendly glide path (i.e. flies OK without power). A test glide is best done over long grass if possible - if something is wrong then the plane will have a soft landing.
To perform a test glide, do your pre-flight checks and, when ready, turn on the transmitter first, then the receiver. Extend the transmitter antenna fully if using a MHz rc system.
Holding the airplane at face-level and facing in to the wind (important: learning to fly an rc airplane is best done in a gentle breeze or no wind at all - if it's a windy day, wait for a calmer one!), gently launch the plane from your hand. Don't throw it like a dart, a smooth but firm push is all that's needed.
Be sure that the airplane is more or less level when you launch it; if it's launched pointing upwards too much it can stall and crash if minimum safe airspeed isn't reached on leaving your hand.
All being well your plane should glide gently to the ground after a smooth, even flight (use rudder to control the glide direction).
The take off / hand launch
If your rc airplane has landing gear and you are flying from a smooth flat surface such as tarmac, concrete or very short grass you might prefer to take off from the ground rather than hand launch.
With all pre-flight checks complete and everything ready to go, place the airplane on the ground facing in to wind and stand immediately behind it. Smoothly push the Tx motor stick to full power and let the plane accelerate along the ground - you may need to use the rudder to keep the plane going in a straight line.
Smoothly apply a small amount of up elevator and the plane will take off from the ground and your flight has begun!
If you are flying a model airplane in an area of grass and the plane has small wheels, or your plane has no undercarriage at all, you will have to hand launch it instead of taking off.
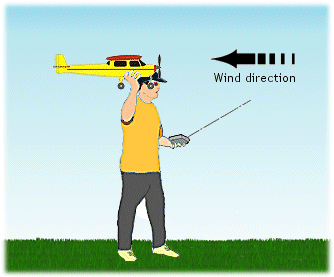
The principle here is simple - hold the airplane at head-height and hold it level, pointing in to wind. Put the motor to full power and give the plane a firm launch, making sure the plane remains level as it leaves your hand. Don't try an underarm 'lob' as you might have seen on videos, leave that method of hand launch for when you've got some experience. And even then, a conventional hand launch is still the better option!
It's very important that the plane is launched at flying speed otherwise it's going to stall and crash, and this is particularly true of lower powered rc airplanes.
![]() Read more on take offs and hand launches.
Read more on take offs and hand launches.

Above: hand launch at head-height and in to wind.
The flight
Your method of getting airborne, i.e. a take off or hand launch, will depend on whether your airplane has landing gear and what sort of surface you are flying from. Either method is straightforward and with all things being well your plane should climb nicely away from you once airborne.
As soon as it is airborne, you need to watch it all the time and concentrate on what it's doing and how it's flying. It's tempting to look down at the transmitter but this won't get you anything, apart from in to trouble! So long as you are holding both sticks and controlling the plane, that's all that counts - you really don't need to look at the transmitter to understand what's going on.
When flying your model airplane use small, smooth stick movements to start with, this is very important. Over compensating is one of the biggest causes of first flight crashes.
Don't let the plane fly too far away from you because it will get too small to see and you will become disoriented. Similarly, you don't want it too close to you either! A safe minimum height is around tree-top height, say, 70-100 feet or so.
Once you've settled at about that height, gently turn the plane and get used to its flight characteristics, remembering not to make sharp turns. Don't move the sticks to their maximum positions - keep the moves soft, smooth and small.
When flying, always use common sense; don't fly close to people or property and keep the plane at a sensible height and distance from yourself, but not too far away that you can't see it properly. Although the radio control gear has a range of hundreds of feet, you don't have to fly your airplane far before it gets too small to see what it's doing. That's when the disorientation sets in.
![]() Read more about flying your rc airplane.
Read more about flying your rc airplane.
Trimming the airplane
 'Trimming' is the act of adjusting the airplane controls whilst in flight so that it flies in a straight and level line on its own, with the Tx sticks in their neutral positions and 'thumbs off'.
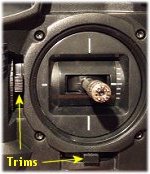
You may find that your plane has a tendency to turn one way or another when you aren't steering it (particularly to the left due to the torque from the motor). Use the small transmitter trims to fine-tune the neutral position of the control surfaces.
After you apply some trim, let the plane fly on its own for a few seconds, then re-adjust accordingly. The aim is to get the model flying straight and level with no input from you at the transmitter.
Bear in mind, though, that if you use full power while trimming, the plane will likely want to climb, so do your straight and level trimming at around half to three-quarter power and at cruising speed.
![]() Read more about trimming your rc airplane.
Read more about trimming your rc airplane.
The landing
What goes up, must come down!
Without doubt the landing is the hardest and most nerve-racking part of learning to fly a radio control airplane.
All airplanes should be landed in to wind wherever possible, this is very important. A crosswind landing is acceptable and sometimes unavoidable but never try and land with the wind, it doesn't work too well! Why? Because the following wind reduces the relative airspeed of the airplane, thus reducing lift and increasing the stall speed.
When you're ready to land, fly a downwind leg a safe distance in front of you, either right to left or left to right depending on wind direction. Turn the airplane back towards you when it is safely to your side (not directly in front of you).
Line the plane up with where you want to land and reduce power or turn the engine off completely if there is no proportional speed control. Keep it in a straight line using the rudder, and let the plane fly down in a smooth approach until it touches the ground.
Use the motor power softly to try and control the rate of descent of the plane - using elevators will obviously have the same effect, but will also effect the speed of the plane i.e. too much down elevator will increase the approach speed, while too much up elevator can cause a stall close to the ground if your airspeed is already low.
If at anytime you are unsure about your final approach, apply power and do another circuit before lining it up for another landing*.
Alternatively you can of course go for the 'straight in' approach if you've been flying further out to your side - just bring the airplane in from the side and commence the descent as above.
*There's no shame in missed approaches! It's better to try 5 times and go home with your airplane intact than to rush a landing and take the plane home in pieces! The landing is the most nerve-racking part of flying when you're new to the hobby, so remember not to panic if you're finding it hard to begin with.
![]() Read more about landing your rc airplane.
Read more about landing your rc airplane.
Important tips to remember:
- Choose your flying site well. A large, clear open area is essential and think about other people in the area - believe it or not, not everyone likes rc airplanes!
- Think about weather when flying model airplanes. Small park flyer type airplanes are light and are adversely affected by wind. Fly on calm days, or in a slight breeze. If nearby trees are bending over, it's probably best not to fly!
- Always make sure that the radio gear batteries are all good before you fly; even just one dead cell will result in a dead model airplane, guaranteed! I know, because I've been there...
- Do your pre-flight checks! Countless rc pilots have crashed seconds after taking off, because of something stupid like not checking that the ailerons were working the correct way. Believe it or not, it happens regularly!
- When flying model airplanes and your plane is coming towards you, the turns will be back to front. This is something that will catch you out in the early days but you'll quickly get used to this 'reverse control'. A trick to remember is to move the Tx stick towards the lower wing, that will right the plane.
- If you get in to trouble and your airplane isn't doing what you want it to do, cut the motor. 9 out of 10 times this will greatly decrease the chances of any serious damage, but of course this depends on the situation.
- And by far the most important point to remember when flying model airplanes is this... Have fun!

Remember also that flying model airplanes for the first time is a nerve-racking experience, so don't be too concerned if you find your heart in your mouth and your hands getting shakey! Just keep things smooth and practice at your own pace.
With time you'll gain much confidence and will soon be able to move on to bigger and better rc airplanes and be able to fly aerobatics.
