

My Weasel Evo (MKIII) RC Glider Review
This is my Weasel Evo rc glider, a 'flying wing' based glider manufactured by Californian company Dream-Flight and is the third generation of their popular 'Weasel' aircraft.
I've never really been a big fan of flying wing-type gliders but a raving magazine review of the Weasel Evo soon had me reaching for my wallet on the way to do some Googling. I found the glider at T9 Hobby Sport (UK), and out of stock! After e-mailing Rich there to put my name down for one I could do nothing but play the waiting game; about a week later an e-mail from Rich informed me that a new batch had just flown in from sunny CA, so I duly put my order in and a few days later the W-Evo was in my hands.
What's in the Weasel Evo box?
Well let's start with the box itself, rather than the contents. Dream-Flight have a company policy to be as environmentally friendly as possible and the box is produced from 100% recycled cardboard. But it's the sturdiness and shape of the box that creates an excellent first impression of the kit - there's no wasted space (or cardboard). It has been said that the box can be used to transport the glider if you choose the knock-down version, but this is only an option if you have detachable ailerons - highly unlikely!
Opening the box reveals the neatly packaged Weasel Evo glider foam pieces (incidentally, the W-Evo is injection-moulded EPP), a clear 'canopy', a small bag of hardware and the instruction booklet. The canopy is in fact an under-belly hatch that covers the receiver and battery pack bays.

Above: the box and neatly packed glider. Below: what's inside.

A quick flip through the instruction manual reveals two things; firstly that there's really not much to do to get this little critter up together, and secondly that the instruction manual is one of the most comprehensive and well written manuals to have ever been produced for an rc glider kit! It really is clear, concise and full - kudos to Dream-Flight for making the effort there, where so many other manufacturers fail.
Down to W-Evo business
One of the first decisions to be made is the choice of transportability.
Dream-Flight give you three options; a permanently assembled glider with wings glued, a knock-down version with removable wings or a hybrid permanent/knock-down version with removable wings but taped in place. I opted for Door #2 because at 900mm wingspan the Weasel Evo is just a tad too big for my personal transport preferences; I mostly fly from my local hill which involves a 15 minute walk to get there and so carrying the Weasel there in smaller bits, in a custom-made bag, is a tad easier for me. But, if your journey to the slope is made in the car then go for the permanently attached wing option.
Each wing has a thin carbon spar running through the middle of it, visible through small holes in the underside of the wing panel, and in all versions of the glider a larger carbon spar is used for a wing joiner.
The difference between the permanent and knock-down versions is that four Rare Earth magnets (included in the kit, complete with the 'north' side of each one marked) are used to help hold the wing panels in place. Now obviously the knock-down magnetic joint isn't going to take as much abuse as the glued one but the combination of the carbon joiner and magnets does make for a strong wing joint, perfectly adequate for my style of flying at least.

Above: the carbon joiner and Rare Earth magnets (arrowed) all hold the wing in place well.
 Dream-Flight recommend Goo adhesive, or similar, to hold the magnets in place but I didn't have any to hand so some CA was brought in to play. One point to make here is that if you do choose the knock-down version be sure to remove any excess foam from the wing seat area (shown right) - the manual tells you to do this anyway (check all the glider parts) but any excess foam in this particular area prevents the wings locating 100% correctly and hence the magnets don't get as firm a hold on each other as they should.
By far the biggest job to do on the Weasel Evo is the preparation of the elevons. Two oversize trailing edge balsa pieces are supplied and the manual contains a full size template (shown below) to cut out and place on each piece to get the required cut angle of each end. Again, a very nice detail of the build and hats off to Dream-Flight for thinking that one through carefully.
Before the template can be used the balsa needs to be cut down in both width and length. Cut the angled inner and curved outer ends with the template, drill the control horn holes (marked on the template), do a quick bit of sanding and job done!
I covered my elevons in red polypropylene tape but the choice is yours. Hinging the elevons to the wing panels is an easy job with the roll of 3M tape supplied with the kit, two full length strips are used per elevon.

Above: the elevon template is a very nice touch.
If you haven't already decided on your choice of radio equipment for the Weasel Evo, now's the time to do it.
With the elevons attached the next major step is radio gear installation. Having said that, there's the covering to consider beforehand. Dream-Flight do recommend that the Weasel Evo is covered to add a degree of protection but the actual need to cover your glider is going to depend largely on where and how you fly; my local hill is covered in long grass and I don't fly particularly aggressively (i.e. combat style) so I opted to not cover my Weasel but to make it stand out with decals instead (more on that later).
Regardless of whether or not you do cover it, it is recommended that the wing leading edges are taped with reinforced tape to prevent the inevitable dings and scrapes.
Back to the radio gear installation - my choice of servo was the great little 9g unit from Etronix hooked up to a Spektrum AR6100e receiver and an 800mAh AAA battery pack. Everything fell into place perfectly, the servos being held in place with high-strength double sided tape and a couple of blobs of Gorilla Glue, and the Rx held in place with velcro.
A switch harness is required for the Weasel Evo and slides into a perfectly sized hole, its tight fit being enough to hold it in place. It's covered by a clear plastic disc on top of the fuselage, held in place with two velcro dots. Dream-Flight provide a choice of two stickers to go on the plastic, or of course you can use your own or leave it clear.

Above: the receiver switch gets covered with a plastic disc, to which you can apply a sticker. Note the neat cut-out for the charging connector of the switch harness - Dream Flight thought of everything with this kit!
Everything about the installation of components is perfectly thought out, including moulded channels for the servo and battery pack leads, and if you use the right size bits then no chopping of foam is necessary.
Final jobs are fitting the fin (taped in place, a ten-second job), the cutting to size of the plastic belly hatch (actually this job is one of the first listed in the manual, but I left it to last), connecting the servos to the elevons (standard white plastic linkages - one adjustable - and carbon rods supplied), setting up the elevator/aileron mixing on your transmitter and balancing the Weasel Evo; mine required a small amount of lead in front of the battery pack to achieve the recommended balance, incidentally the CoG points are small dips moulded in to the underside of each wing panel just behind the servo bays.

Above: belly of the Weasel. The plastic Rx/pack cover was painted orange.
The Weasel Evo look
Jazzing up your Weasel Evo is all part of the fun and there are several options. A low temperature iron-on covering is one of them, as is the aforementioned polypropylene (or similar) tape commonly used on EPP combat gliders. Laminating material another. Paint is a third option but be careful to select the right stuff; not all model paints take to EPP so well but there are suitable ones out there.
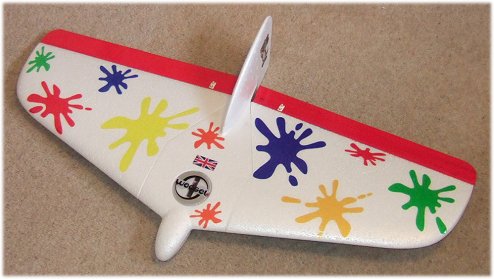
My personal choice was to leave the Weasel uncovered but to make up some sticky-back vinyl decals. I have no idea why but the idea of a paintball-splatted W-Evo came to mind, so that's what I did! I produced splats of various sizes and colours in Paint Shop Pro and then printed them out on to inkjet-friendly clear vinyl. This was my first serious attempt at such a thing and they came out very well.
A small Union Jack flag and a cartoon Weasel for the fin completed the look, and I also added tape stripes under the wings for orientation purposes.
Above: my splatted Weasel Evo. Below: the underside of the glider.

Weaseling around
The first trip out with my Weasel Evo was made to my local hill in about 15mph winds, gusting to about 20mph.
With the wind blowing up from the south I had to fly on the most unfriendly part of the hill, but to my relief the W-Evo coped with the conditions very well.
The first thing I noticed was that I hadn't dialled in enough travel, not by half! Response was slow even on full rates, so I quickly brought the glider in and increased the travel on both glider (control horns) and Tx. The second flight was much better and just a couple of clicks of up elevator trim were needed to get a good neutral flight path.
What a blast! The Weasel Evo handles the wind very well indeed and is a delight to fly. The roll rate is good and inverted flight requires very little in the way of down elevator.
My choice of colours really helped out in seeing what the glider was doing, disorientation not an issue with this one!
Here's a video of the third flight. I had the camera angled a bit low so it's not brilliant footage, sorry...
Subsequent flights with my Weasel Evo have been in winds down to about 5mph, and up to the high 20s. I would say it's 'enjoyable' limit is about 25mph, anything more than that and it becomes too much of a struggle for my liking.
In summary: the Dream-Flight Weasel Evo is, in my opinion, one of the best quality and well thought out kits of its type around. Being the 3rd generation Weasel it's clear that Dream-Flight have had plenty of opportunity to hone the Weasel MK.I & II designs and produce this outstanding kit. Everything about the kit has been thoroughly thought out and the quality of the pieces is excellent.
For the experienced modeller just a few hours will see this glider come together, and the beginner shouldn't have too many problems if the instruction manual is followed carefully. A big thumbs up for this one I think!
Related pages


All of this and much more is covered in our Beginner’s Guide 👇
The Beginner’s Guide To Flying RC Airplanes is a 139-page, easy-to-read e-book written for complete newcomers. It explains exactly what to buy, where to fly, and how to avoid costly mistakes.
📖 Start reading now